The Task
My group, Nico, Alex, and I, were assigned two tasks. The first task was to design a microgrid to power San Marin and supply it with a sufficient amount of energy for the year. The second task was to use an Arduino board, a breadboard, and a computer to design an "art show" using programming and circuitry. This was our process.
Power Novato
The first task was to design a microgrid that satisfies the year-long energy consumption of San Marin. Before that, we did a few labs and other experiments.
Wind Turbine Design
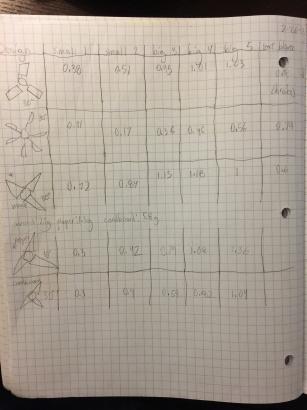
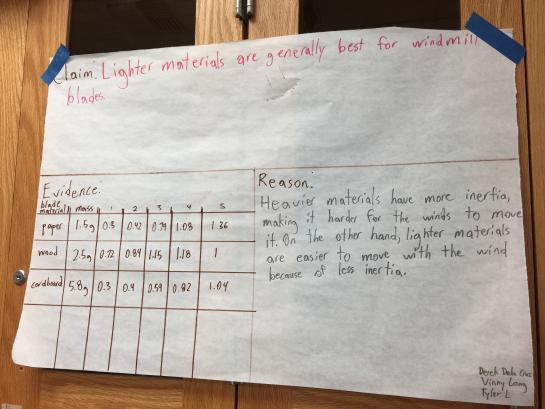
Our first experiment was experimenting with wind turbines. Our goal was to find ways to make the blades of the windmills most efficient. In our research we discovered that the material of the blade affected its efficiency. We had to look deeper to see by how much, however. We discovered that paper, with a mass of 1.5 g, performed significantly better than wood and cardboard, each with a mass of 2.5 g and 5.8 g. There were some outliers in our data but we realized that we recorded wood's data the day before, meaning that the distance from the fan may have been different.
|
|
Electrical Fields
After the turbines we started studying electricity itself. One of our first experiments was a static electricity experiment. We also worked with simulations involving charges and how they interact. The purpose of this was to learn and understand how charges interacted and how we can use this knowledge in circuits. We learned that opposite charges attract and similar charges repel. This knowledge would be applied in the next experiments we conducted. An important law discussed at this time was Coulomb's Law.
Coulomb's Law (F) - The relationship between charges. This law is used to find the force of attraction or repulsion between two charges. The unit of the force is newtons (N). The equation is F = (k(q1)(q2))/d^2. "q1" is the first charge and "q2" is the second charge. The charges are measured in coulombs (C). k is the Coulomb's constant which is 8.99x10^9 Nm^2/C^2.
Simulations:
Electromagnet Lab
Continuing our studies, we started experimenting with electromagnets. An electromagnet is a magnet where the magnetic field is generated by an electric current. The point of the experiment was to answer the question, "How do electrical currents influence magnetic fields?" We narrowed this question down to:
"How does the gauge of a wire affect the magnetic force of an electromagnet?"
We tested this by counting how many paper clips an electromagnet would pick up magnetically. We did this with different wire gauges (AWG) and then compared it. After compiling and analyzing our data we created a write-up about it. This included background information, our hypothesis, our process, our data, and our analysis. This is the document.
Dissecting a Motor
|
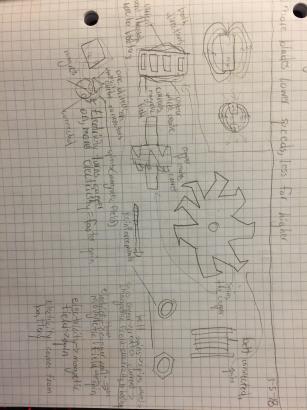
We started working with motors to better understand how electric currents could create magnetic fields. There were two motors. One was small and the other was large and from the auto shop. We dissected them and drew each piece. Later we learned about how the parts interacted and how the motor functions. Essentially, magnetic forces is what causes the motor to turn. In more detail:
1) Electricity is sent from a battery to the copper coil. 2) Because of its conductivity, the copper becomes electrically charged. 3) The charge creates an electromagnet, thus creating a magnetic field from the electrical current. 4) The magnetic force turns the motor. |
Design a Microgrid
The last part of this part of the project was to design a microgrid for San Marin. The grid had to be fully sustainable so if the electrical grid went out then San Marin could sustain power for a while longer. To get more information we went up to Sonoma and visited a farm that had a microgrid. People there talked about what was needed and their methods and motives. Our final plan for the microgrid uses natural gas and solar panels as ways to generate power. We acknowledge how it'll be stored, how seasons will affect it, and how the energy would be transferred. We go into further detail about this in the presentation we created.
Robot Art Show
Our second task was to use an Arduino board and a breadboard to design and program an art show for our future robot overlords. In order to gain experience, we worked with circuits and learned about the terminology of circuits in order to perform best when the project started.
Circuits
|
We started off the unit by learning about the terminology and parts of a circuit. This would be very valuable since these words would appear multiple times throughout the rest of the unit.
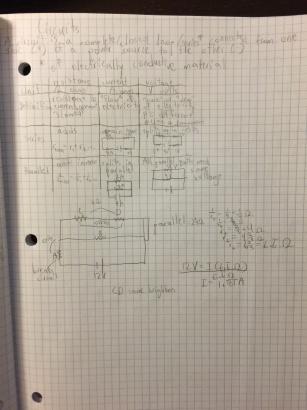
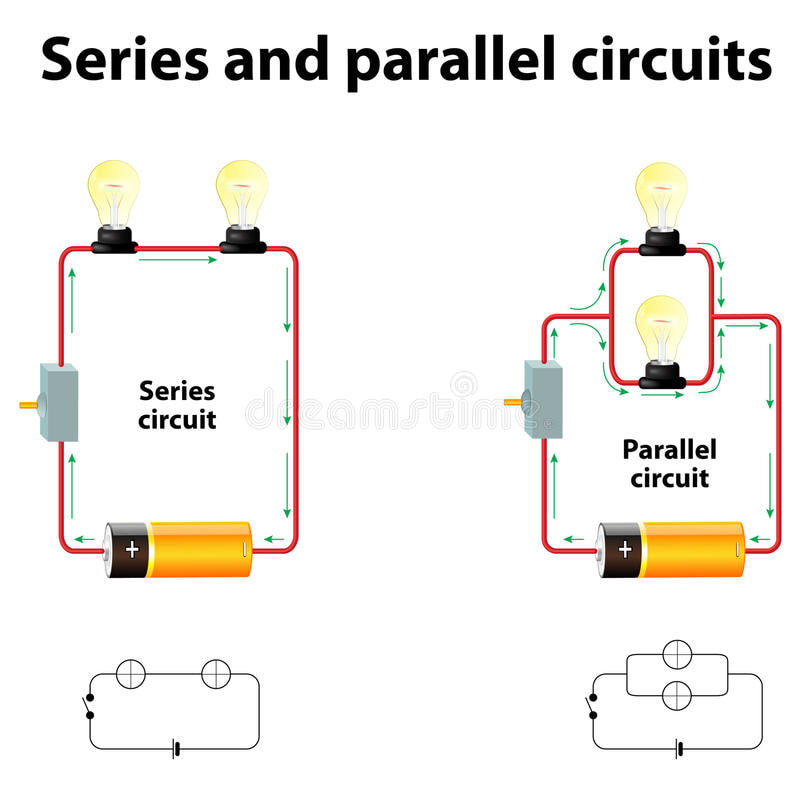
Circuit - A complete loop of conductive material from one side of a power source (+) to the other (-). Voltage (V) - The potential difference from one end to the other end of a component. It can be thought as the "push" of a circuit. Its unit is volts (V). Current (I) - The "flow" of electrons in a conductive material. The current remains the same in a series circuit. The unit is amps (A). Resistance (R) - The amount the current is slowed or resisted through an obstacle. In a circuit, an example of this is a resistor. The unit for resistance is ohms (Ω). Series Circuit - A circuit where all components form one large loop. The current must go through all these components. Parallel Circuit - The components are on separate paths and the current can flow either or any path. Ohm's Law - An equation that can be used to find voltage, current, and resistance. It is "V = IR". Power (P) - The rate at which electrical energy is transferred in a circuit. The equation is P = IV or P = I^2R. The unit is watts (W). Kirchhoff's Laws - Two laws relating to current and voltage. Current Law - The sum of the currents going into a connection must equal the sum of the currents leaving the connection. This can be thought of as a "conversation of current" idea. Voltage Law - The sum of voltages around a circuit must be equal to zero. Every resistor takes away voltage, so it would make sense for voltage to be 0 at the very end. |
|
Electronics
|
With the basic terminology understood we now began experimenting with electronics and actual circuits. There were multiple components we used. We used a breadboard and a potentiometer. A breadboard is a board that can be used for circuit building and a potentiometer, or pot, is a resistor with controllable resistance. This can be controlled by a knob on top. We also worked with LEDs, which are lights, and capacitors, which are components that can store charge. We discovered multiple important ideas about current, voltage, and resistance. These were the major ideas:
1) In series, voltage splits in proportion to resistance. 2) In parallel, voltage is the same on all pathways. 3) In series, current is the same through the entire circuit. 4) In parallel, current splits inversely to resistance (3x more resistance leads to 3x less current). We ended off this part of the unit with the Blinky Light Quiz. We had to build a circuit that caused an LED to flash on and off. We managed to get the circuit working on our first try. Because of this we were finally able to begin the Arduino part of this unit. |
|
Arduino Boards
The final part of the project was to design and program an Arduino board to make an "art show". This would be the heaviest part part of the project because of the difficulty of having to learn how to program. First off, what is an Arduino board?
An Arduino board is a board consisting of many components that can be used for circuitry. It has a CPU along with multiple pins with different functions. There are analog pins and digital pins. Digital pins can output only 0V or 5V. Analog pins can output values between 0V and 5V. An Arduino board can be connected to a computer to send code to itself. The code is a variation of C++ that can be put on the Arduino application on a computer. This code can also be sent to a breadboard that can be connected to the Arduino which can act as a battery.
We learned the code by using a tutorial handbook that ran us through every command. It helped get us familiar with the programming. Some common (but not all) commands include:
void setup(); - This commands run commands within its brackets once.
void loop(); - This command loops the commands within its brackets indefinitely.
pinMode(pinNumber, OUTPUT); - This command sets a pin (digital) as either an output or an input. It's usually set as output because this can be used to "turn it on". This command goes in "void setup();".
digitalWrite(pinNumber, HIGH); - This command sets a pin as HIGH. What this means is that voltage is sent through that pin. If an LED is connected to that pin, that means that the LED turns on. This command usually goes in "void loop();".
digitalWrite(pinNumber, LOW); - This command sets a pin as LOW. This means that voltage is turned off on that pin. This command usually follows a "digitalWrite(pinNumber, HIGH)" command, meaning that the LED turns off.
delay(1000) - This command puts a delay between commands. The number in parentheses is in milliseconds. In this example, the delay lasts for 1000ms, or 1 second.
int - This command sets a value to an "integer". For instance, if we use the command "int ledPin = 13", whenever we put "ledPin" into a command, that means it'll associate to pin 13.
// - Two slashes represents a comment. A comment is text that doesn't affect the code. It can be used as notes in the actual code. If a comment needs to be multiple lines, we can use /* and */.
Below is the code we used for the project. The code plays notes rhythmically to play the main theme of Ducktales, the chorus line of September, and the riff of Crazy Train.
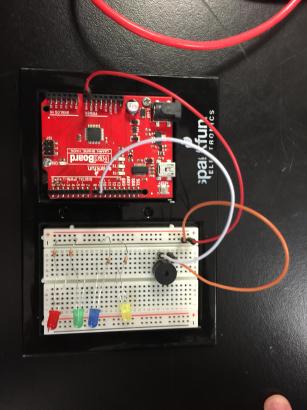
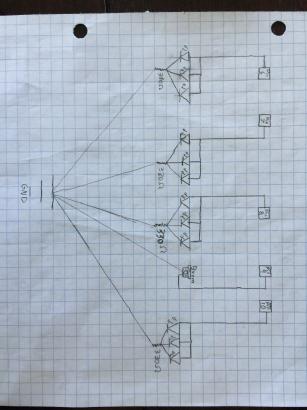
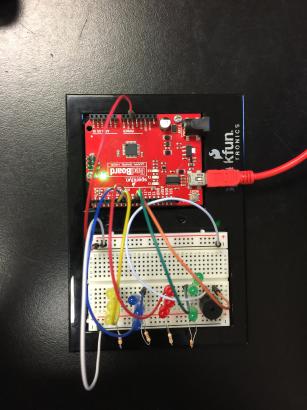
During the experiments we used more components than we did for the electricity experiments. We used servos, buzzers, temperature sensors, LCDs, and flex sensors. For the final circuit design, we used LEDs and buzzers. A buzzer is a component is a component that plays a frequency. This can be set in the code to play actual notes on a piano. The way we incorporated LEDs into the project is by having certain notes that, when played, sent voltage from a pin into the LEDs. Overall the project was extremely successful and it was very enjoyable. Below is a picture and video of our circuit.
|
|
|
Reflection
This was probably the longest, deepest, most intense unit in STEM I have done to date. There was so much electricity work and a lot of terms being thrown around. The programming was also difficult to understand. Besides that, I think I had a pretty strong performance in this project. Some of my strengths were the programming and my attention to detail. During the project, I did a lot of the programming. I was able to comprehend most of the concepts and ended up programming a very successful board. The songs flowed and there was not any errors in the code at all. It functioned the way I wanted it to and worked exactly the way I wanted it to with the board. Another strength was my attention to detail. This skill would prove to be extremely valuable because we were able to get the Blinky Light Quiz done on our first try. This skill also helped in the creation of the microgrid. I kept in mind multiple factors. One of the more important factors was the seasonal effects on the grid. The skill helped in both parts of the project.
With multiple strengths comes multiple weaknesses. My weaknesses were my teamwork and my contribution to circuit building. One of my teammates was out for a good amount of the project. When he returned, I struggled to catch him up on the Arduino board and the plan. Instead, my other teammate did most of the helping for the one who returned. I also sometimes struggled to talk about changes in the microgrid plan with one of my teammates. This caused minor disagreements over certain aspects of the plan and, as a result, set us back a little. My other weakness was my contribution to the circuit building. This also partially involved my lack of communication with my teammates. When learning about Arduinos, I did the programming and my teammate did the circuit building. While this was efficient, neither of us were able to understand the other's work in full detail. It would've been more helpful if I shared my work with my teammates. It would've benefited everyone in the team.
Even though there were problems, my strengths helped bring the team forward. This project overall was super fun and I'm excited about the next project.
