The Task
My STEM group, Vinny, Tyler, and I, were tasked to make a solar efficient building for San Marin that uses as little electricity as possible, satisfies the demands of the San Marin faculty and administration, and is aesthetically pleasing. The building needs to use methods used to exploit sunlight which includes skylights, clerestory windows, and solar tubes. The building should be also take into account materials, dimensions, and cost.
Earth's Layers
We began the unit by discussing concepts such as Earth's layers. Earth has 4 major layers:
Crust - This is the top section of the Earth. It's the thinnest of all the layers and is rocky and solid. We live on this layer.
Moho Discontinuity - This is a unique layer in the Earth between the crust and the mantle.
Mantle - This section of Earth is mostly made of molten rock and is extremely hot. It is the largest of all the layers.
Outer Core - This section of Earth is all liquid. It is extremely hot and consists of melted iron and nickel.
Inner Core - This is the center of Earth. It is solid iron and nickel and is the hottest part of Earth.
All these layers compose our Earth's geology and its form.

|
Orbits and Solar Angles
After studying Earth's layers we studied orbits and solar angles. We learned about how seasons are created by hemispheres being exposed to more or less light. Seasons are also reversed around the world. For example, when it's summer in the Northern Hemisphere, it is winter in the Southern Hemisphere. Some key terms include:
Apogee - The farthest point of an object's orbit from the body it orbits around. This has the highest potential energy. Perigee - The closest point of an object's orbit from the body it orbits around. This has the highest kinetic energy. Escape Velocity - The velocity required to escape an object's gravitational force. For Earth, it's 11.2 km/s. Solar Angle - This is the angle that the sun hits at a certain spot on Earth. A higher angle means more sunlight, while a lower angle means less sunlight. Equator - This is the latitude line of exactly 0 degrees. It wraps around the exact center of the Earth. We learned that the solar angle changes depending on your position on the Earth. This is important information because this means that the sun is always south of our location. This will affect how we design our building to get as much sunlight as possible. |
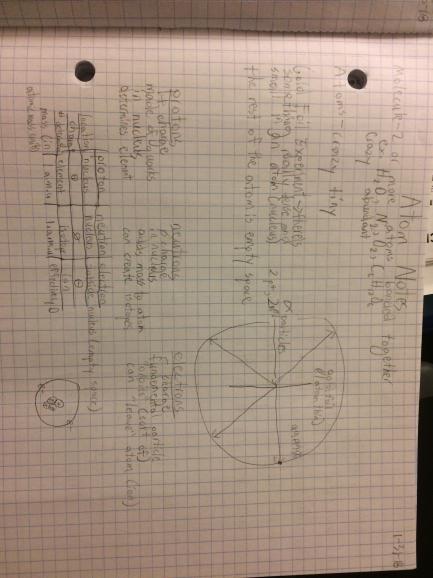
Atomic Structure and Heat
The next aspects we studied were subatomic particles. We learned about the parts of an atom and molecules. From there we learned how that information ties in with heat and the many ways they are involved.
Molecule - A group of 2 or more atoms bonded together. Atom - The building blocks of matter. They are extremely small. Proton - A positively charged particle located in the atom's nucleus, or center. It determines the atom's element. Neutron - A particle in the atom's nucleus. Its number determines the atom's isotope. Electron - A negative charged particle located outside the atom's nucleus. It is extremely small and it's usually balanced with the number of protons. An imbalance creates an ion. Heat - All heat is energy. It is caused by the vibration of molecules at the molecular scale. Radiation - Heat moving through space as a wave. Conduction - Heat being absorbed and moved through a solid. Convection - Heat circulating through a fluid (liquid or gas). Insulation - This is resistance to conduction and heat. |
|
Daylighting Design Model
This was when we really started to learn about the ways sunlight can be used to light rooms. Our job was to create a building that used multiple methods to light the rooms with the sunlight. Some day lighting methods include:
Clerestory Window - A window high in elevation. It's used to catch the sunlight at high angles.
Light Shelf - A horizontal surface used to reflect light into a room. They are usually placed high on walls.
Skylight - A window placed on the roof of a building to allow sunlight into a room.
Sun Tube - A tube-like structure used to reflect sunlight into a room. The sunlight bounces off the walls of the tube and eventually spreads out.
Our house's dimensions were 50ft x 20ft. The front door was on the north side near the living room and kitchen. We had a kitchen, a living room, a hallway, and multiple bedrooms and bathrooms. Our house had 4 skylights all scattered around the house, 6 windows, and one large light shelf in the hallway. When testing, our building was moderately successful. The hallway was the only room that was lit at all angles. This ended up proving that light shelves facing south were extremely effective in lighting rooms. We wrote a CLEAR paragraph about this.
Justification Document
Our building has to use as little electricity as possible. We wrote an entire document about why we should do this:
Science Building
This was the final project. This was the project we had to do described in "The Task" above. A group of architects was coming to our classroom to see our presentations. This was our presentation:
|
Plan - Our building's dimensions are 132ft x 180ft x 12.5ft. What's special about our plan is that it is submerged 6ft into the ground. The building is open with a large 50ft x 100ft courtyard in the center. There are 10 classrooms, 2 bathrooms, and 1 prep room. There'll be multiple sets of staircases and one set of ramps for accessibility and gravel pathways that allow access to all parts of the building.
Materials - The roofs will be made of aluminum. The walls will be made of concrete and be painted bone white. The floor will be made of linoleum tiles and will have a tan color. The ceilings will be similar to the school; they'll be polystyrene drop-out ceiling tiles and be colored bone white. The interior highlights, such as the doors, will be painted emerald green. Lastly, in order to support the large windows, there will be steel beams. General Calculations - The total area is 23,760 ft^2. The total volume is 297,000 ft^3. The courtyard area is 5,000 ft^2. Because the building is submerged underground, the required volume to dig out is 142,560 ft^3. Daylighting - Our building uses multiple methods to light the rooms. Our main idea is to use 3 clerestory windows per classroom on the back walls. The front of the classrooms will also have large windows that allow students to look at the courtyard. |
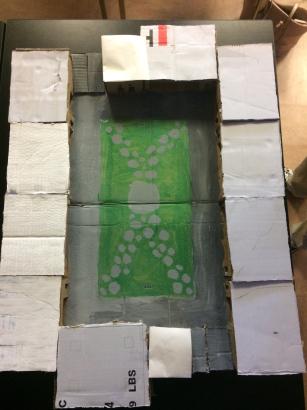
The model we built to physically represent our project.
|
Reflection
This project was unique because it emphasized more of the "engineering" part of STEM rather the "science" part of STEM. It was a nice change in environment because there was a different emphasis and I was working with new people. This was probably the hardest project to date and, as a result, I felt that my contributions changed in both good and bad ways. Some of my strengths included the presentation design and the numbers. A lot of my work went into designing the presentation. I organized each slide and made sure that nothing seemed out of place or was factually incorrect. One of the slides, "The Task," got a strong positive response from the teacher which helped my group's score. I also worked with a lot of numbers. I worked with the scale and cut different pieces of the model to scale. I found multiple figures including the area, volume, and different sections of the building such as the courtyard area and the classroom area.
With all of these strengths aside, I definitely had some categories where I lacked strength. Some of my weaknesses were building the model and my cooperation with my teammates. While I did cut pieces of cardboard for the model, I didn't do much else with it. My teammates did the gluing and painting. I didn't contribute anything to the model beyond supplying my teammates with cardboard. My cooperation with my teammates was also rough. At times, we would have disagreements over certain aspects about the building. The material colors is a strong example of this. I would be stubborn about my ideas and refuse to change. This would hinder my team's progress because I would refuse to progress.
Although my weaknesses did hinder my team, my strengths made up for it. My group was strong all throughout the project and in the end we succeeded.
